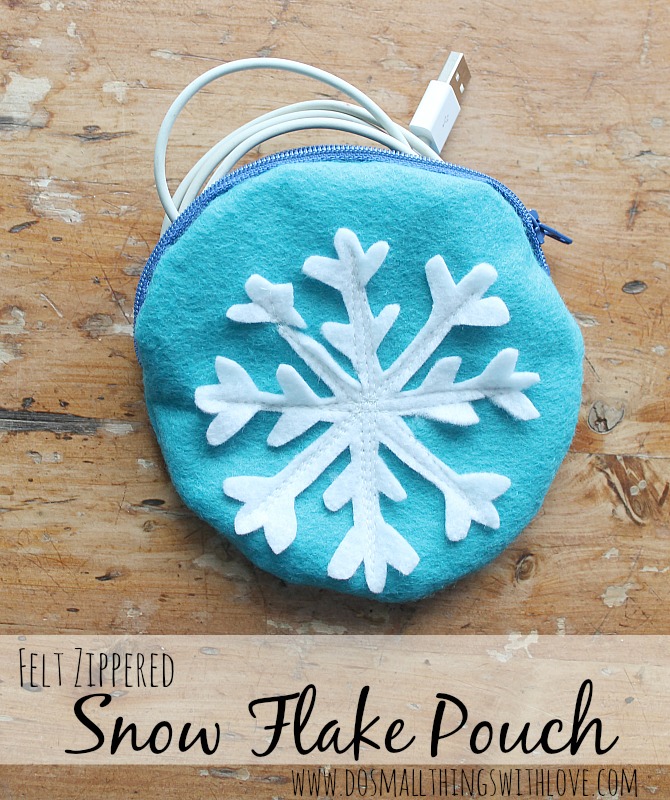
Zippered Snowflake Pouch #MyFavoriteBloggers
Hello!
I hope that you are finding a way to stay nice and warm this winter.
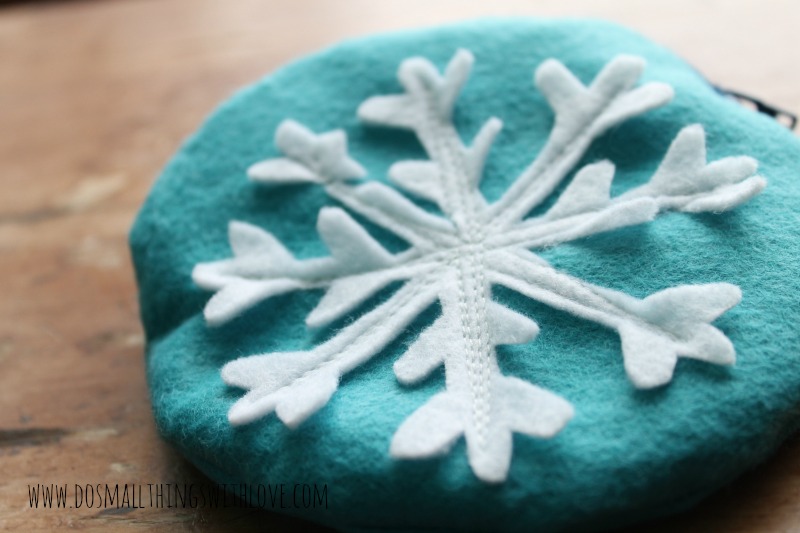
It is another cold day here–but I am happy to stop by and share this Zippered Snowflake Pouch, made out of felting, with you all today.
It is a simple and fun project that can be made in less than a half-hour, and it is part of this month’s edition of the #MyFavoriteBloggers themed crafts post.
As I said last month, and the months before, once a month I team up with a few of my best blogging buddies, and we all craft/cook on the same theme.
This month we focused our creative energies on the theme of winter.
For a glimpse of everyone’s projects, and links to all of the tutorials, go all the way to the bottom of this post.
But first,
How to Make a Zippered Snowflake Pouch
Supplies:
- Wool Felt, I used Teal and White
- 7″ Zipper
- Packing Tape
- Sharp Scissors
- Sewing Machine
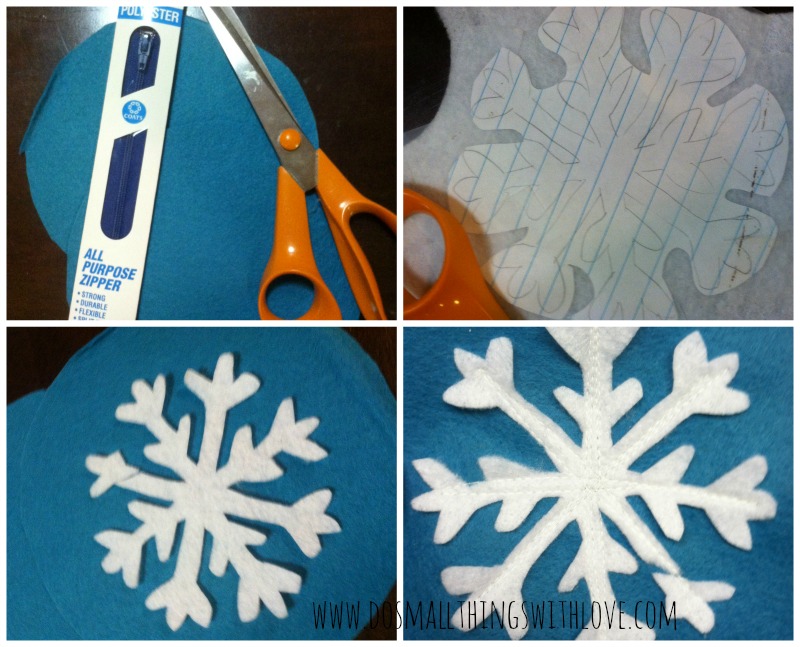
- Using the Teal Felt, cut out 2 5″ circles. Use THIS METHOD to get a precise cut.
- Trace/draw your snowflake shape onto paper. I traced a snowflake I found in the overlay section on PicMonkey. Then, using the packing tape, tape the paper directly to the white felt, and carefully cut out the snowflake shape. Make sure your scissors are sharp! As you can see, I accidentally snipped off the end of one of my stems. oh well!
- Center the cut-out snowflake on one of your teal circles.
- Head to the sewing machine and using white thread and a straight stitch, stitch down all of the straight stems of the snow flake. I stitched up and down a couple of times.
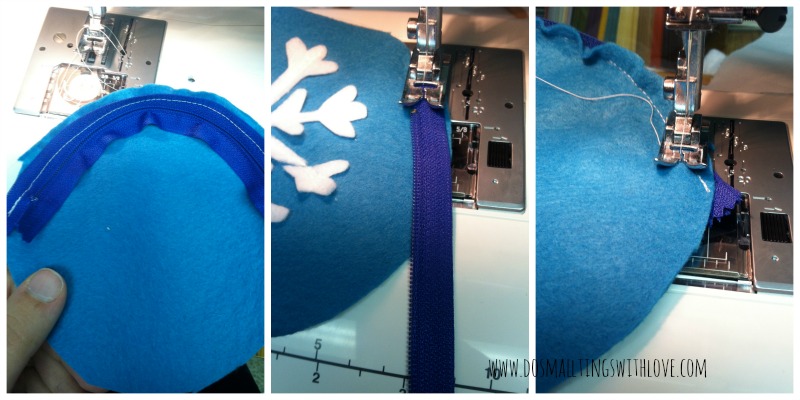
- Time to put in the zipper. Now, since we are using a straight zipper along the edge of circle, this is going to be a little tricky…and it won’t be perfect! With right sides in, sew one edge of the zipper along the top edge of the back circle.
- Then, unzip the zipper. Once again with right sides in, sew the other side of the zipper onto the front circle.
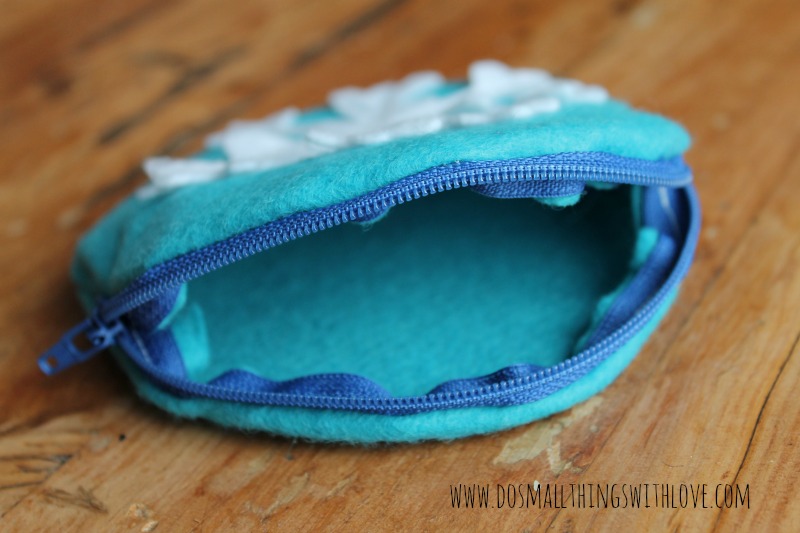
- Once that is complete, zip the zipper about 1/2 way shut. Match up the two circles, with right sides in and sew along the outside. Make sure to sew over the edges of the zipper at both ends, so your pouch doesn’t have any holes! Finally, unzip the zipper and flip the pouch right side out, pushing out the edges.

I don’t know about you, but I can always use another pouch.
We are on the road a lot and I have a tendency to just shove odds and ends, like chargers, in odd places… And then have a terrible time finding them.
It’s also important that things zipper shut.
Well, here is my contribution to this month’s #MyFavoriteBloggers post. Just wait until you see what my bloggy friends did with this Wintery Theme. But first, let me re-introduce you to them:

From left to right, top to bottom: Sky from Creative Capital B, Adrianne from Happy Hour Projects, Melanie from It Happens in a Blink, Amy from One Artsy Mama, ChiWei from 1 Dog Woof, Sarah from Repeat Crafter Me, Kadie from Seven Alive, Bethany from Pitter and Glink, Kara from Happy Go Lucky, Lauren from Thinking Closet, Tara from Suburble, Nancy from Do Small Things with Love, Meredith Wait Til Your Father Gets Home, and Kirsten from One Tough Mother
And, here are our Projects!
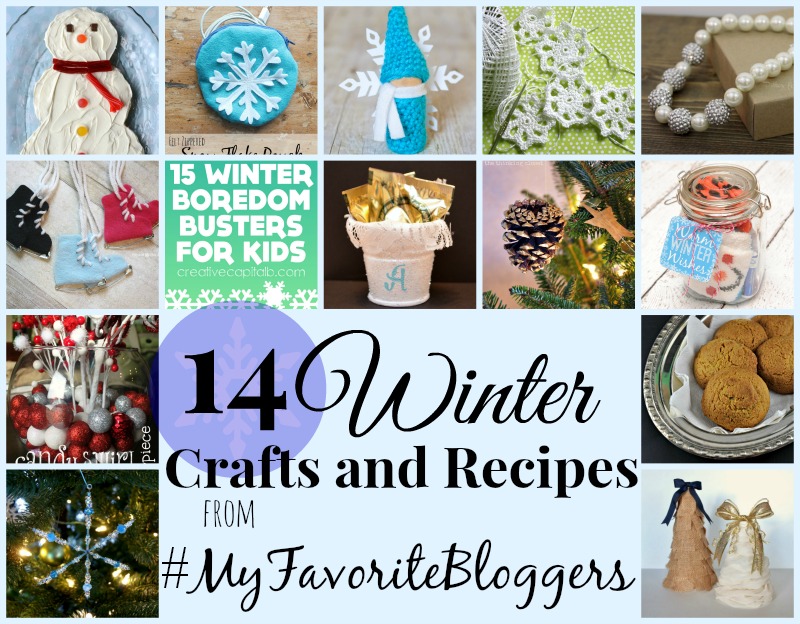
Once again, from left to right, top to bottom:
Peppermint Sugar Cookie Snowman, Zippered Snowflake Pouch, Crocheted Winter Gnome, Crocheted Snowflake Pattern, Winter Princess Pearl Necklace, Safety Pin Ice Skates, 15 Winter Boredom Busters for Kids, Winter Party Favors, Gold-Brushed Pine Cone Ornaments, Winter Gift in a Jar, Candy Swirl Winter Centerpiece, Egg Nog Cookies, Easy Beaded Snowflakes, DIY Christmas Trees.
Please take a minute to visit some of my friends and their wonderful blogs! I promise that you won’t be disappointed!
Once again, thanks for being here, and have a wonderful day,

[…] Sugar Cookie Snowman, Zippered Snowflake Pouch, Crocheted Winter Gnome, Crocheted Snowflake Pattern, Winter Princess Pearl Necklace, […]
[…] Sugar Cookie Snowman, Zippered Snowflake Pouch, Crocheted Winter Gnome, Crocheted Snowflake Pattern, Winter Princess Pearl Necklace, […]
[…] Zippered Snowflake Pouch from Do Small Things with Love […]
[…] Az ötletért köszönet: Do Small Things with Love […]
What a fun pouch! I love felt since you don’t have to finish off seams! BEAUTIFULLY done!
[…] left to right, top to bottom: Peppermint Sugar Cookie Snowman | Zippered Snowflake Pouch | Crocheted Winter Gnome | Crocheted Snowflake Pattern | Winter Princess Pearl […]
[…] Sugar Cookie Snowman, Zippered Snowflake Pouch, Crocheted Winter Gnome, Crocheted Snowflake Pattern, Winter Princess Pearl Necklace, […]
This is so cute! I love the snowflake!
What a cute little pouch!
[…] Sugar Cookie Snowman, Zippered Snowflake Pouch, Crocheted Winter Gnome, Crocheted Snowflake Pattern, Winter Princess Pearl Necklace, […]
This is so cute, Nancy! I can’ t believe how quickly you can whip up something so lovely! I’m definitely going to try zippers this year. I’m like ChiWei – they make me nervous!
[…] Sugar Cookie Snowman, Zippered Snowflake Pouch, Crocheted Winter Gnome, Crocheted Snowflake Pattern, Winter Princess Pearl Necklace, […]
I am so TERRIFIED of zippers and you make it look so easy! I love the idea of using felt so I don’t have to worry about linings and raw edges. And yes, we can all use more pouches!
[…] Sugar Cookie Snowman / Zippered Snowflake Pouch / Crocheted Winter Gnome / Crocheted Snowflake Pattern / Winter Princess Pearl Necklace / […]