EASY Watercolor Portrait

Hi! Although it doesn’t look like it, this is a very easy watercolor portrait that ANYONE can do.
Seriously, you have to try it!
I don’t like to have favorites. But I think this just might be the all-time FAVORITE project that I have ever done.
And I feel this way for two reasons: First of all, it is totally easy. I have very limited skills when it comes to drawing anything realistic, especially portraits, and I was able to do this, so ANYONE can do this.
And secondly, this is a watercolor portrait of my godmother, Mary, who, unfortunately, passed away from cancer when I was young.
Below is a picture of Mary that has become almost iconic in our family.

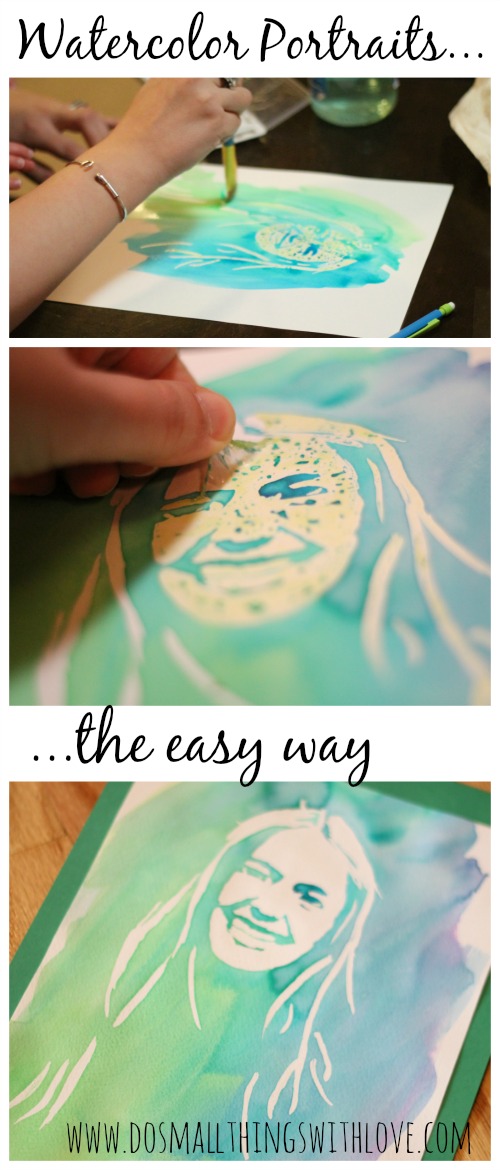
How to Create an EASY Watercolor Portrait


1. Scan your picture and upload it to a photo editing program.
I use the free version of Picmonkey. Adjust the exposure and contrast of your picture until it is almost all black and white, no grey. It takes a little bit of trial and error.
When done, print your picture at the desired size.
2. Take a piece of watercolor paper and place it over the printed picture. Tape in place. Then, place both pieces of paper on a light table/overhead projector, or if you don’t have either of these, like me, use a glass table with bright lights placed beneath. However you do it, you need to see that printed photo through the watercolor paper, which is heavy paper. Then, paint on the art masking fluid to the white areas of the photo. Make sure to get all the details of the eyes. It is going to look funny at this stage–I thought mine was not going to turn out at all!
3. When the art masking fluid is dry (wait 12 hours to be sure) pull out the watercolors and go to town! Just so you know, my toddler did some of the painting at this stage.
4. And finally, the reveal! When the watercolor is completely dry, rub the art masking fluid and pull it off. See in the picture how it peals off? Pretty cool, right?
And, ta-da!

I love it! I am planning on doing several more of these. This one is a gift for my mother. Mary, we miss you!
Thanks for stopping by–and for sharing the memory of my godmother with me!
I plan on using this method again because it is a really cool way to transfer an image.
Here are a few other projects I have done that transfer images in different ways:


WOW! I also want to try it ! Thanks for sharing this 🙂 Nice post!
This portrait looks very lovely. Thank you for providing the detailed tutorial
I can’t wait to try it!
LOVE YOUR PRECIOUS ART!!💜💜💜💜💜🌈
God bless your Heart 💜 & Soul.
Xo, Kimberly.
Happy Jan.7,202.!!!!☺️
Love this website.
This is beautiful! Thank you so much for the tutorial! I’ve never done anything like this but using your instructions I was able to make my own. I used a frisket pen and was afraid it wouldn’t turn out. But it came out great! Thanks again!
Thank you
lovely, appreciate the inspiration.
Question: after transferring your image to the water- color paper in order to commence the Liquin, how / when does one remove the graphite and at what point please? before painting it? or ….
Oh I love this!! I will definitely do this one!
Loved this technique. I too am a Mary with a birthdayon St. Pat’s. I do admit I’ve always gone by my middle name: Teresa.
You are a mary with a birthday on St. Pats??? That’s crazy! If I met you in real life I would give you a big uncomfortable hug 😉
How do you clean your paint brush after you use it for the masking fluid? I have tried masking fluid before but hated the lack of precision with the tips provided. I’m excited to try with a paint brush!
Honestly, I use a cheap brush and have to throw it away afterward. Best of luck!
Me gusta mucho. Seguro que a tu tia le encantaría.
I am a non-artist and am now on my way to Michaels to purchase the supplies. I love this project…thank you for sharing.
yay! I’m a non-artist too!
thank you so much for the tutorial. I did one of my daughter and I think it came out great!
Awesome! I’d love to see a picture. Maybe share it on my facebook page? https://www.facebook.com/Smallthingswithlove
LOVE! LOVE! LOVE THIS!
thanks! If you give it a try, I’d love to see it!
beautiful…..
[…] first saw the technique here and thought I would give it a shot. I did try it a couple of other times before this project, one […]
Great tutorial!tahnks and Happy holidays
I’m insanely in love with this idea! Thank you so much for the brilliant idea. I can’t wait to try this.
I’m sorry that Mary passed away so young, that is a terrible loss. This is a beautiful way to remember her.
I’m excited for you to try it! Send me a pic of your finished product!!
Thanks for the inspiration! I love watercolor – and portraits – but don’t always have a ton of time. This is a sweet shortcut! In a pinch: I’ve seen tutorials on Pinterest where a white crayon is used as the resist. : )
Yes! I’ve thought about using a white crayon, have yet to try it but I need to! I think it would give it a bit of a different look, but cool all the same.
LOVE YOUR PRECIOUS ART!!💜💜💜💜💜🌈
God bless your Heart 💜 & Soul.
Xo, Kimberly.
Happy Jan.7,202.!!!!☺️
Such a Great Cool 😎 idea to try Thanks to whom suggested the white crayon!! I’m also myselfgoing to try a smidge less expensive route as it’s what I have onhand at times depending on my location and that is a thin bead of hot glue?! Lol we will soon see!!!!!!💜
Good blessing to all of you!!!!!!!💜✔️🥰
Great Idea!!! Love it! patsy
I just got done making a lovely Graduation gift of one of a kind! Thanks for your simple tutorial!
I made a thin layer of the Masking Fluid and it dried really fast. Within 2 hrs my project was finished
and matted on foam board for framing! So personal! Love it!
I am so happy that it worked out! I’d love to see a picture of your gift!
Nancy, I love this tutorial. It is something I’d love to do. I pinned it. We were both on the ahalogy Facebook group at the same time! 🙂 Linda
Love this! I’m pinning it and going to try one with a pic of my grandmother who passed away. Beautiful! Visiting from sits
Did you use colorless art masking fluid or pigmented?
[…] Easy Watercolor Portrait […]
Cool effect! I’ve used masking fluid before though, you don’t need to wait 12h, 15mins is more than enough! Just don’t put on a massive load and it will dry super quick 🙂
Nancy, I came upon your site at Pinterest. This looks like a great craft and such a wonderful keepsake! I’m a crafter and I am always looking to try interesting things (also, ones that involve some sort of painting). I was extremely touched by how this craft came about with regard to your Godmother, Mary. I actually had tears in my eyes when I read what happened. Such a beautiful woman and a terrible loss. However, you somehow keep her memory alive and that is wonderful. I’m sure many of us can relate to loss of a loved one (I know I have). May God Bless you and your family. I can’t wait to try this great craft! Many regards… and Thank you!
Wow! How cool is this? Mary was such a vibrant young woman with such a beautiful smile!! It made an awesome watercolor pic! I’m so sorry she was taken so young. Thanks for a wonderful idea!
What a nifty idea. It looks wonderful.
Wonderful tutorial! I loved the outcome!
Great post!! I included it in my post Βόλτα στη Γειτονιά #26 🙂
Have a great week!!
What a beautiful tribute to both your Aunt and your Mother. It is something I will definitely try. God bless you and your family.
I’m so sorry to hear about this tragic story, but it seems you’ve found a wonderful way to pay homage to her memory. This turned out BEAUTIFULLY! And I’m tempted to try this technique myself. Pinning!
A sweet tribute toyour aunt.
Wow, this is really really really cool! I love how it turned out! I would love if you would come share this, or another project at my link party today! http://domesticsuperhero.com/2013/03/14/sharing-with-domestic-superhero-thursday-link-party-2/ Hope to see you!
This is so cool! I really, really, really want to try this. Gotta find that fluid!
Wow! That is amazing! And what a sweet gift for your mom. I’m sure she will treasure it.
This is beautiful! I can’t wait to try this for my mother!, My Dad passed away, so this will be perfect for her!!
Nancy I cannot even begin to say how much I love this. You said “easy” and I seriously thought – no way. No way could I do this. But… maybe?? The possibilities have me so excited!!
Uhmmmmm… WOW! That is an incredible work of art! Also, what a meaningful gift.
I think I may try my hand at this. Now I have to go searching through photos.
Thank you for the great tutorial!
Tara
http://www.suburble.com
This is amazing! Good work!
I found you over at Sumo’s Sweet Stuff Link Party.
I’m having a giveaway over at my blog, so check it out!
http://cloverandmustard.blogspot.com/2013/03/a-few-of-my-favorites-giveaway.html
Wow! This is such a neat technique. I’m sorry for your loss. I lost my Godfather when I was young to cancer as well. But this is a lovely way to remember her beautiful smile!
Bonny @ thedomesticatedprincess.com
This is so cool! I am sorry to hear about your loss but what a great way to remember her!
xx
Kelly
Sparkles and Shoes
My 1,000 Follower Giveaway!
This is so cool! I’m pinning it for the future. I love water color, but I have no technique. I’d love to do a silhouette of our son like this.
wow, what a great idea to give the picture some new life.
Wow! I love it! Watercolor is my favorite medium. Thank you for sharing!
This is great! I can’t wait to make portraits of my sons using this method. Thank you for sharing it and making the tutorial so easy to follow. Do you mind if I link my readers to it?
I’d love for you to share this with you readers!
This is amazing. I just pinned this and I am anxious to try this out! What a fabulous idea. Thank you so much for a great tutorial!
This is such a cool tutorial! Yours turned out wonderful!
Nancy, your picture turned out beautifully! What a meaningful and beautiful gift for your mother. Your directions even made the project seem doable for a non-artist like me.
It seriously is so easy. I am not artistic, either!