State Love: Beginner’s Embroidery Project
It is a good thing to love where you are from.
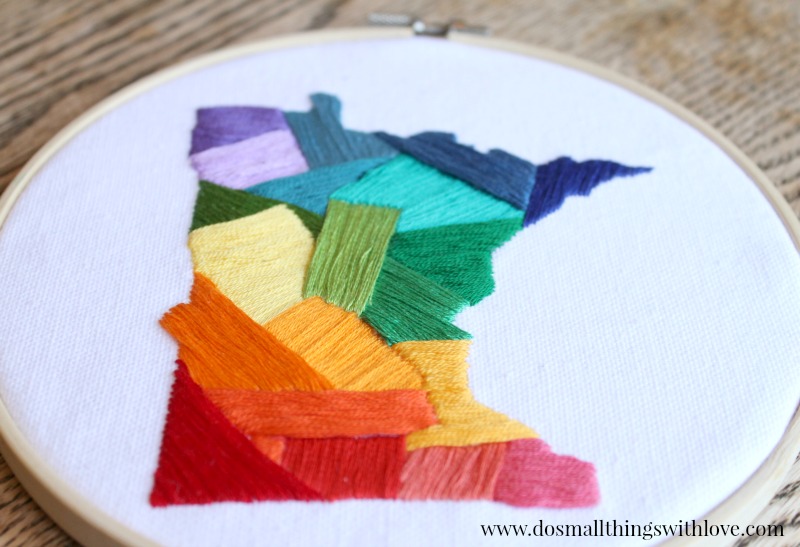
And, although this was put to the test for most Minnesotans this winter (wow) I can still say that I love where I live: Minnesota.
It’s nothing fancy and it gets terribly cold, but it’s where I was born, it’s where my children were born and it’s home.
I hope that you feel this way about your own state, and if you do, here is a simple project to celebrate your home state: State Love, Beginner’s Embroidery Project.
My husband is a transplant, brought here years ago with work, but together we are a Minnesota family.
Like all Minnesotans the minute we get a hint of nice weather we are outside soaking it up!
Other people in other states might think that they take advantage of nice weather, but until you have survived a Minnesota winter like the one we just had, you have no idea.
Who knows if we will always live here–in fact the chances are good that my husband’s job will relocate us at some point, but I at least, will always remain a Minnesotan.
This is home and even the shape of our state invokes a feeling of home in me.
I am also incredibly biased (admittedly) if someone or something is from Minnesota, chances are I’ll like it!
So, of course, I made my State Love project in the shape of Minnesota, but this is a project that could easily be done in the shape of any state or country…or county…really, any shape at all. But, before I get ahead of myself, here is the how-to:
Supplies:
- Sturdy Canvas Material, white
- Iron-on Interfacing
- Water Soluble Marker
- Shape of State displayed on computer screen
- Embroidery Hoop
- Embroidery Thread and Needle
As a first step, take your canvas material and iron on a similar-sized piece of interfacing to the back.
This will give you a more hardy place to stitch.
Next, head to your computer and pull up an outline/image of your state.
Copy/paste/zoom until the state is the actual size you would like to stitch.
Note here–if your state has fun details like Minnesota, don’t go too small.
But keep in mind that this project does require some time to stitch–and more time the bigger the shape.
Once you have your state shape pulled up on your computer, take your fabric and tape it directly to your screen.
Then, grab your water-soluble marker and trace the shape of your state directly onto your fabric.
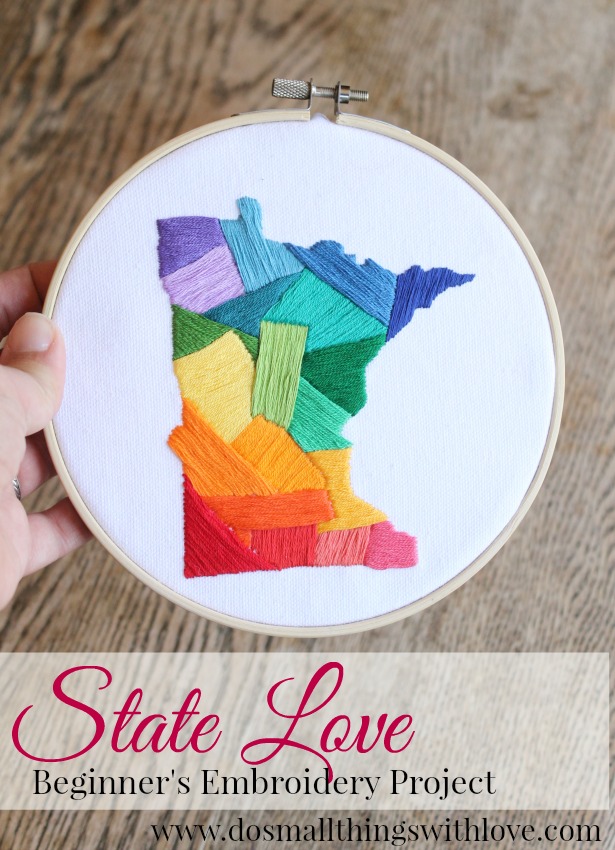
See my outline below?
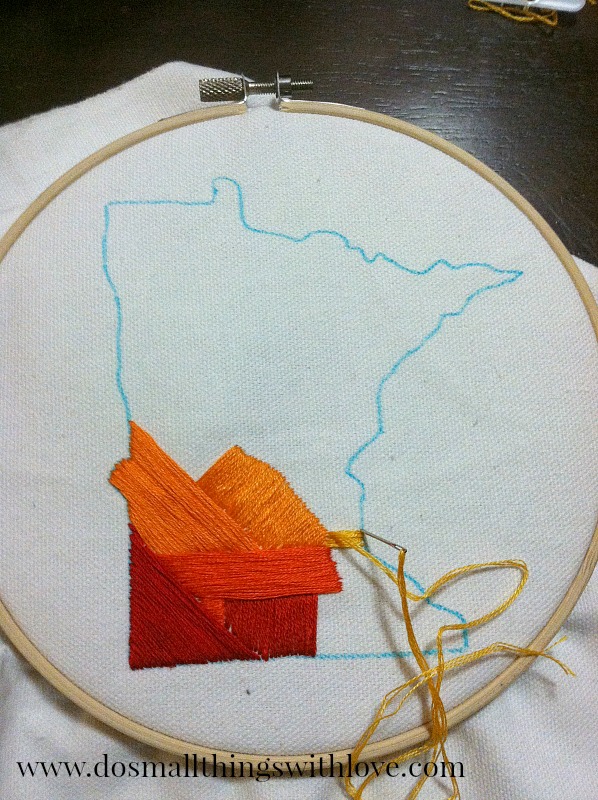
Next, start stitching!
The stitch I used here is a satin stitch.
A satin stitch is basically just a bunch of long stitches running parallel that eventually fills an entire area.
I stated in the bottom left corner with diagonal stitches and then once that area was full.
And I changed the color thread and did some vertical stitches along the bottom.
I personally didn’t plan out the patches of stitches in different stitches, but you could do this.
Also, I used three threads of each color at a time.
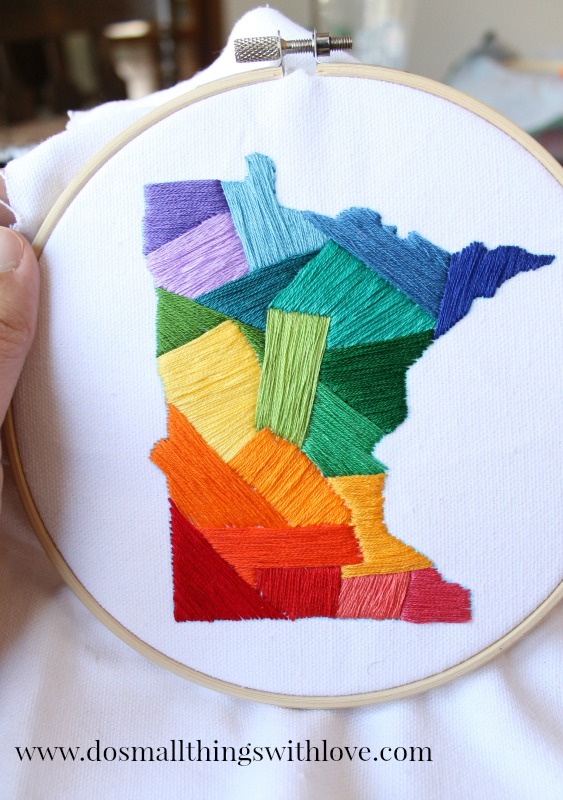
As I stitched I worked to use a rainbow of colors.
And, the above picture is what my pretty little Minnesota looked like when I was done stitching!
The next step is to soak the cloth to remove the water-soluble ink used to draw the outline of the state.
Lay the cloth flat while trying to keep the stitching looking good. Tada!
Now, I know that I started out this post claiming that this is a beginner’s embroidery project and it really is.
The entire project uses just one stitch and it is easy to cover up mistakes with the satin stitch (which is what I love).
Just keep stitch and cover it up! Give it a try!
I do really love satin stitch. If you are interested in some other project ideas, check out these:
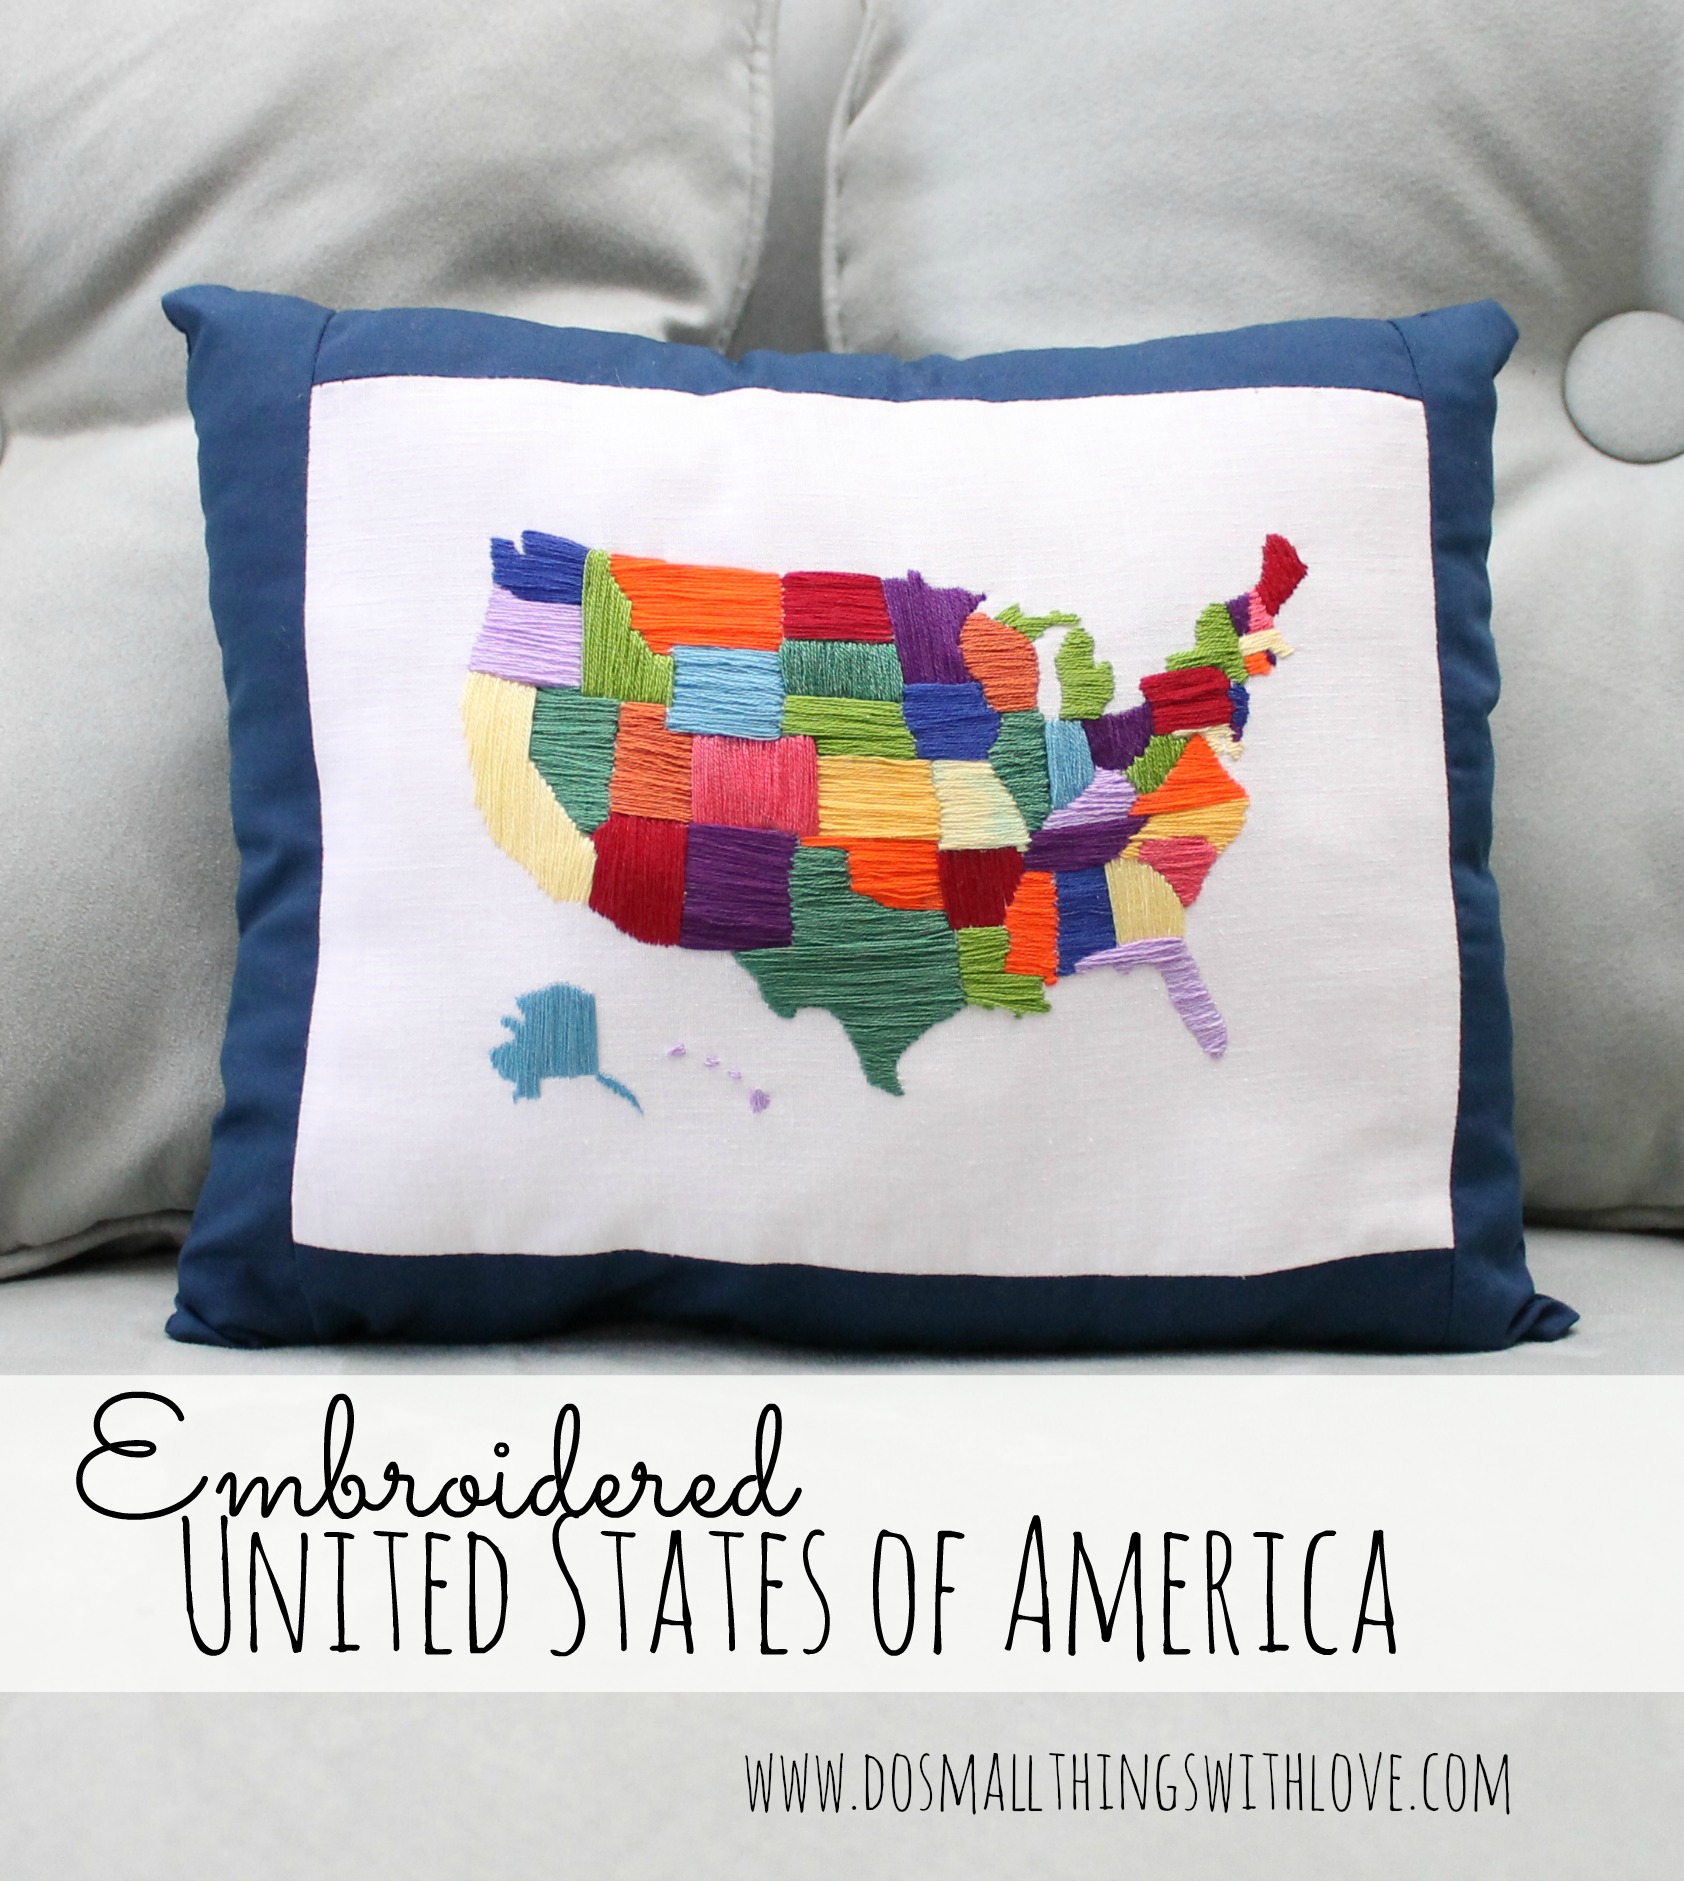
Embroidered United States of America
Thanks, and stop back here on Friday for a whole collection of crafts that show some love to your State!

Your Embroidery looks so colorful and beautiful. Good idea with countries shapes. Thanks for sharing.
Perfect timing for this post! Appreciating the time and effort you put into your website and in-depth information you offer. Such a great embroidery project Worth sharing! Please do continue sharing updates! Thanks a lot!
Wow! Very nice cloth. Where can i get this cloth? Thanks for sharing.
Yes Nancy you are right, a best utilization of scrap. And thank you for sharing such information. I love the rainbow of colors and i’ll surely try this 🙂
Hi! What cloth did you use for this and where can I find it? Thanks!
Those are so cool! Can’t wait to try it out myself.
beautiful as starting samplers my grandmother taught me to embroidery on green silk and drawing my own butterfly.
Hi Nancy,
I love to do embroidery. Your rainbow design is really beautiful.
Love the MN. I think I can handle this for my kids. Thank you!
This is awesome DIY project.
Love this idea, but the fact that I live in Kentucky makes this a very intimidating project!
Hi, how did you deal with the back? Thanx.
Here’s what I did. When I was done stitching I simply ironed on a second layer of interfacing, to seal in the stitching. Then I put it back in the embroidery hoop and finished it off like she explains in this tutorial: http://www.sewmamasew.com/2014/07/how-to-finish-frame-embroidery-summer-nights-stitch-along-part-three/
Love to see your finished project!
I am going to try this for my home state, Virginia…however, I would like to do each county as it’s own block/thread color.
that’s a super great idea! I’d love to see how it turns out!
Such a great idea! Can’t wait to try this. Thanks so much for sharing!
g
This is so pretty! I’ve been thinking I need to show some Missouri pride since I have moved out of my home state, and I love this project for that. Nicely done, and a great tutorial!
What a great new project – I love the look.
thanks!
So awesome, Nancy!
thanks Kara!
You amaze me Nancy! All your embroidery pieces are so gorgeous!
This is so stunning, Nancy, and I’ve been really wanting to try my hand at embroidery…so you caught my attention with the word “beginner” in the title. Definitely pinning so I can try this one out!
I would love to see a Florida version of this project 😉
I still have yet to make one of these. I love them! Maybe this summer after I finish my cross stitch and see what colors of embroidery thread I have left over.
It’s a great way to use scraps, for sure!